Introduction
Escalations allow you to control how tickets move up or across teams. When a conversation needs additional attention or expertise from partner teams, you can escalate it to make sure the right person or team handles the issue. For example, when a Customer Success agent can’t resolve a customer’s analytics dashboard access issue after basic troubleshooting, they’ll escalate to a Backend Systems engineer who can investigate system configurations and database-level permissions that Customer Success doesn’t have access to. Escalations work seamlessly with SLAs and automations to create flexible workflows that streamline ticket handoff.Creating an Escalation Path
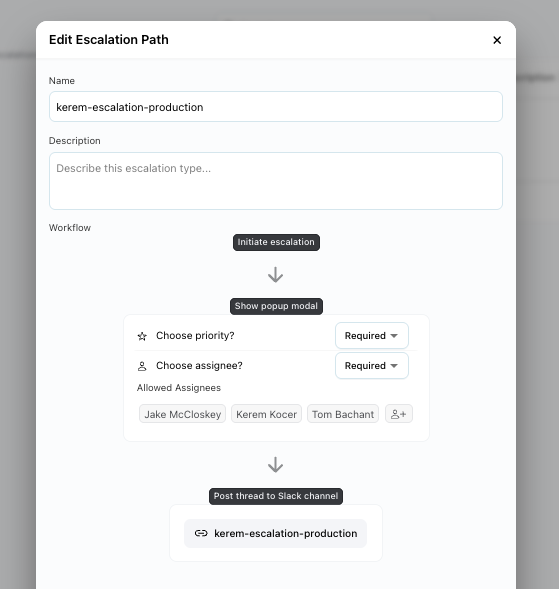
To begin, you’ll need to create an escalation path. This defines the workflow that tickets will follow when escalated.Efficient Escalation Strategy
Before creating escalation paths, consider what each team can actually handle:- Customer Success: User onboarding, basic troubleshooting, account changes, feature questions
- Backend Systems: System configurations, database issues, API problems, performance issues
- Engineering: Code bugs, new feature development, infrastructure problems
- Product: Feature requests, UX issues, roadmap questions

Setup Steps
- Navigate to Settings in the left sidebar
- Select the project you want to configure escalations for
- Click on the “Escalations” tab
- Select “Create escalation path”.
Configuration Options
After entering the name and description, you can configure your workflow with the following options:- Priority Selection: Choose whether agents can select priority levels during escalation
- Assignee Selection: Configure if agents can choose specific assignees
- Target Channel: Set which channel the escalated ticket will be posted to
Depending on your use case (Internal or External), you may want to select a different channel than your triage channel. For instance, if you’re escalating from Customer Success to Backend Systems, you might route to a dedicated #backend-support channel rather than your general triage channel.
Initiating an Escalation
Once your escalation path is defined, you can initiate an escalation from any conversation.How to Escalate a ticket from Unthread UI
- Open the conversation you want to escalate
- Click the “Escalations” dropdown in the conversation view
- Select the appropriate escalation path
- Fill in the required details based on your configuration
While the details field is optional, it’s recommended to include troubleshooting steps or context for the escalation. For example, “Customer can’t access analytics dashboard. Cleared cache, verified login, checked basic role assignments. Issue persists - needs Backend Systems investigation of user permissions.”
How to Escalate a ticket from Slack UI
- Open Manage Conversation shortcut (from message actions)
- Click the “Escalation Conversation” button in the modal.
- Select the appropriate escalation path
- Fill in the required details based on your configuration
The Additional Details field will post a message to the escalation thread for partner teams while the Public Notes field will post a note to both the escalation thread and main thread. Use Additional Details for internal technical notes like “Customer Success troubleshooting completed - escalated to Backend Systems for permission investigation.”
Working with Escalations
Escalations will be assigned according to the path you defined. The escalation assignee will receive notifications just like any other conversation assignment.Viewing Escalations
You can view escalations either in your inbox by selecting the escalations filter option on the left sidebar, or from Unthread App in Slack by selecting Escalations view from the “Inbox type”.Escalation Workflow
- Acknowledge: Your first step is to acknowledge the escalation
- Investigate and resolve: Proceed with investigating and fixing the issue as usual. For example, if you’re a Backend Systems engineer taking over an analytics access issue, you’d investigate user permissions, check RBAC settings, and review recent system changes.
- Resolve: Once work is complete, select “Resolve” to close the escalation
Escalations are considered a separate thread from the conversation, therefore the original conversation remains open until it’s resolved separately.
Escalations and Automations
Escalations can be integrated with automations to create powerful, automated workflows.Available Triggers
Currently, the following escalation events can trigger automations:- Escalation Created: When a new escalation is initiated
- Escalation Acknowledged: When an agent acknowledges an escalation
- Escalation Resolved: When an escalation is marked as resolved
Automation Examples
Here are some common automation scenarios using escalations:- Critical Issue Escalation: Automatically escalate high-priority conversations to on-call teams. For example, when a customer’s entire team loses access to your platform, automatically escalate to Backend Systems engineers.
- Timeout Escalation: Escalate conversations that haven’t been responded to within SLA timeframes. If a Customer Success agent doesn’t respond to a customer within 2 hours, automatically escalate to their manager first, then to Backend Systems if it’s a technical issue.
- Manager Escalation: Escalate customer complaints or sensitive issues to management. When a customer threatens to churn or requests account changes, escalate to Customer Success managers.
- Nudging an Escalation: If an escalated ticket has been inactive for a set period of time, you can trigger a follow-up message. For instance, if a Backend Systems engineer hasn’t updated an escalated ticket in 4 hours, send them a reminder.
While we support reassigning tickets via SLA & Assignment steps, there are scenarios where you may want more complex routing. In those cases, we recommend building those workflows via Automations.
Integration with External Systems
Escalations can trigger actions in external systems through automations:📖 Learn more about building automations in our Automations guide
Best Practices
Escalation Settings
- To provide visibility to end users about when an escalation gets created, acknowledged, and resolved, enable the user-facing notifications from your project settings.

Integration with SLAs
Escalations work best when integrated with your SLA configuration:- Use escalations as SLA actions for unresponded conversations
- Set different escalation paths based on customer priority
- Configure automatic escalations based on response time thresholds
For comprehensive SLA management, see our SLAs documentation

